Pin It button on image hover

Pages

Showing posts with label winter. Show all posts

March 19, 2013

my life after graduation


when did life get to be so hard? everyone says enjoy your college years because when they are over you are shoved right into the 'real' world...like we were living some sort of pretend life - in a way i guess we kind of were. a few hours of classes a day, some exams & papers mixed in with a whole lot of sleeping in, friends, boys & whatever else we wanted to do. it's funny though, because once you have graduated you really do see life so differently. i mean, ya there aren't the pressures of studying for a test until the wee hours of the morning or worrying about your grade in a class, but there are different deadlines & things to worry about that perhaps we never thought about before. & most likely these new challenges are more important than any grade we ever received.

i have been struggling with my purpose in life lately. what will i do in this life that will be good enough to feel like i did something worth while. will it be a job? a hobby? my family? kids? church? next month will mark one year since i graduated & although i feel like i know some of the things i want to accomplish in my life, i also feel like i am a very confused 22 year old. is this normal? i'm sure it is, but it is also frustrating. everyone is different. we all blossom at different times & pursue very different dreams. i simply wish i knew how/when/&what my purpose will be. not knowing what i will to do with my life is kind of scary to me.

on a more cheerful note, i am happy to report that our terrible utah winter may finally be over! last week i went outside for a little walk. it was sunny, no snow on the ground, i could actually feel the warmth of the sun on my face & there was a rather strong breeze. this combination reminded me so much of the santa ana winds back home in LA {my favorite} & i was just smiling ear to ear. it's so funny how the weather can drastically effect your mood & state of mind. i found myself instantly grateful for so many different things that i have in my life. 

:)

March 15, 2013

recipes {spicy peanut noodles with chicken}

oh my. the recipe i have for you guys today is HOT! if you love peanut sauces you have to try this & if you are a big fan spicy asian dishes you will just swoon. the sriracha hot chili sauce really gives this dish a kick but it is oh.so.delicious.


mark loves peanut sauces so i thought i should finally try to make something he would approve of so we don't have to get take out every time he is in the mood for a spicy peanut dish. i have been on a spice kick when it comes to asian food lately {i guess i may just be my father's daughter after all!} & i seriously loved everything about this meal. my favorite part was the heat, of course. but if you aren't a huge spicy person then feel free to cut back on the amount of sriracha you use or you can even take it out all together! i also wanted to mention that the noodles i used were rice noodles, you can purchase these from any grocery store, but if you don't have any on hand you can definitely use a basic linguine pasta as well!

what you'll need >>
adapted from skinnytaste

peanut sauce:
14 oz chicken stock
6 tbsp peanut butter
1 tbsp fresh ginger, grated
2 cloves fresh garlic, minced
1 tbsp sriracha hot chili sauce
2 tbsp honey
1 tbsp soy sauce

chicken:
16 oz chicken breast
salt & pepper to taste
1/2 lime, juice
1 tbsp sriracha hot chili sauce
1 tbsp soy sauce
4 cloves fresh garlic, minced
1 tbsp fresh ginger, grated
1/2 tbsp sesame oil

veggie topping:
11/4 cups broccoli slaw
1 zucchini, cut into thin strips
1 cup carrots, grated
1 cup bean sprouts
2 tbsp peanuts, chopped
1 lime

directions >>

1. combine chicken stock, peanut butter, ginger, garlic, sriracha, honey & soy sauce in a pan. stir occasionally for about 5-10 minutes until well combined. set aside.

2. cut chicken into thin strips. combine lime juice, sriracha, garlic, ginger & soy sauce in a bowl. mix the chicken with the marinade and allow to sit for 5 minutes.

3. boil water & prepare rice noodles as package instructs. i boiled my noodles for about 10 minutes. then drain.

4. heat wok or large skillet. once hot, add sesame oil & cook chicken on high. this will only take 2-3 minutes. once chicken is done remove from the pan & set aside.

5. heat up a little bit more oil in the same pan used for the chicken & then add broccoli slaw, zucchini, carrots & bean sprouts. saute for a few minutes until all of the veggies are tender but still crisp. remove from heat.

6. add cooked noodles to peanut sauce & combine. {if sauce is too thick you can use a bit of chicken stock to thin it out} then add chicken.

7. serve with the fresh veggies on top with a sprinkle of chopped peanuts & a slice of lime.


March 10, 2013

a cozy weekend inside

with the forecast predicting a wet weekend & still feeling a little under the weather, 
i decided it would be cozy few days inside for me.


this was pretty much how i spent my weekend. i was getting over a cold/cough combo from earlier in the week & decided it would be a good weekend to catch up on some business "to do" items while i was stuck on the couch. i composed a "posing guide", researched tips on getting wedding photography published, edited 2 recent weddings i second shot for, posted a new wedding on my website & worked on my photography blog all while enjoying some freshly made cookie dough right out of the bowl. :) 


i guess i wasn't working ALL weekend. on friday night the cook's came over & brought some indian take out. the boys watched the BYU v. SDSU game while maryclaire & i had some much needed girl time. my other grand adventure for the weekend was hitting up costco on saturday. the amount of people that gather at costco on a saturday afternoon amazes me. i am thoroughly convinced that a large portion of them only come for the samples, but can you blame them?

i hope you all had a wonderful weekend!!
& i am so ready for tomorrow night's bachelor finale!! yes, i am one of those girls. ;)

March 9, 2013

i'll take you to the doughnut shop


growing up in a los angeles suburb, krispy kremes were a rare treat for most people in my community. there wasn't a krispy kreme store close by, so little mom & pop doughnut shops were where we got our saturday morning doughnuts from...oh, & on the rare occasion, a quick before school treat ;) but since i've moved to utah i have found the complete opposite to be true! if i'm in the mood for a doughnut then i will typically make the 5 minute trip the the local krispy kreme store...when i first got here i loved having those melt-in-your-mouth treats so close by, but it is now 4 years later & i am kind of over krispy kreme {yes, i said it}!! i just want my NORAML doughnuts back!

so, i did a little search for local doughnut places & decided to try some out. {what a hard job, right?} these beauties are from a place called beyond glaze in draper. aren't they just the prettiest doughnuts you have ever seen???? i almost didn't want to eat them because they were so fun to look at. but that thought quickly passed & i dove in!

^^^ i was so close to getting the maple bacon but decided i would come back with mark & we could try it together ^^^

i would give this place a B+ because they cost double what normal doughnuts typically cost & i thought the they looked better than they tasted. but i only tried one...if i go back then i'll take a couple bites from a few different ones & maybe do an update if i need to :)

what are you favorite guilty pleasures?????

March 3, 2013

life lately {iphone edition}

well, hello there march! 


february went by so fast! here is a little look back on some of our adventures last month. i often forget to take pictures of the day2day stuff...i will work on that! this month was full of baking, eating, hanging with friends, mark's birthday & helping with a wedding!

March 1, 2013

recipes {homemade baguettes}

any french baguette lovers out there???


when my good friend told me that she made fresh baguettes in her own kitchen i was shocked & immediately had to know how it was done! this recipe was relatively straight forward, although you do need to prepare the dough a day in advance & allow enough time to let the dough rise, etc. BUT once you taste the bread you will forget about all of the little steps & be in bread 'n' butter heaven. i am a HUGE lover of bread & this baguette recipe did not disappoint. i ended up making this for the first time last week for my husband's french inspired birthday dinner.

>> what you'll need
yields 4 loaves

5 1/2 cups unbleached bread flour {all purpose flour will work too}
1 tbsp coarse kosher salt
2 1/4 tsp instant yeast {or 1 packet of yeast}
2 cups warm water

>> directions
this is a two day process!

day one:
1. combine all ingredients in bowl of mixer, set with paddle attachment, and mix on lowest speed for one minute until well blended and smooth. {add the flour a cup at a time until you get the right consistency. i used 5 cups of flour} dough should form a coarse, shaggy ball.  let rest, uncovered for 5 minutes.  

2. switch to dough hook and mix on medium-low speed for 2 minutes. dough should be smooth, supple, and tacky but not sticky.  

3. knead dough by hand on lightly floured work surface for 1 minute, then transfer to a large clean, lightly oiled bowl. cover with plastic wrap and immediately refrigerate overnight or up to 4 days.

** dough can also be made without the use of a stand mixer. combine all the ingredients – start with a wooden spoon then switch to your hands when the flour is incorporated. lightly knead until all the ingredients are well blended. let rest for 5 minutes then knead for about 5 more minutes until dough is smooth and slightly tacky.

day two:
1. remove dough from refrigerator 2 hours prior to baking.  

2. gently transfer to lightly floured work surface, taking care to release as little gas as possible.  divide dough into four equal portions. ** i prepared two baguettes & kept the remaining two portions in the fridge to bake during the week

3. pat each individual portion of dough into a thick rectangle.


4. fold the bottom half to the center and seal the seam. fold the top half to the center and once again seal the seam.


5. roll the top half of the dough over the seam to create a new seam on the bottom of the loaf. 


6. with seam side underneath, gently rock loaf back and forth, with hands moving out toward and increasing pressure at the ends, to slightly taper the loaf until baguette is the length of baking sheet. place the formed baguettes on a baking sheet that has been oiled or covered with parchment.  mist top of dough with oil, loosely cover with plastic wrap, and proof at room temperature for about 1 1/2 hours, or until increased to 1 1/2 times its original size.

7. preheat oven to 450 degrees. place a sheet pan, which will serve as steam pan, with a 1-inch rim on shelf under which baguettes will be baked.  

8. remove plastic wrap from the dough 15 minutes prior to baking.  just prior to baking, score the dough 1/2 inch deep with a serrated knife or razor.  transfer dough to the oven, pour 1 cup hot water into the steam pan. {when you pour the water into the pan it will make a really loud noise so be aware!}

9. bake for 10-15 minutes, then rotate pan and bake for another 15-20 minutes, until the crust is rich golden brown and the loaves sound hollow when thumped. cool on wire rack before slicing or serving. 

original recipe from notwithoutsalt.com


um, yum right???

February 26, 2013

another birthday around here

& this time it was the man of the house's big day! 

^^^confused & then excited about the mini wad of cash he recieved
{i might have had sort of a hard time with his gift this year...so, money it was!}^^^
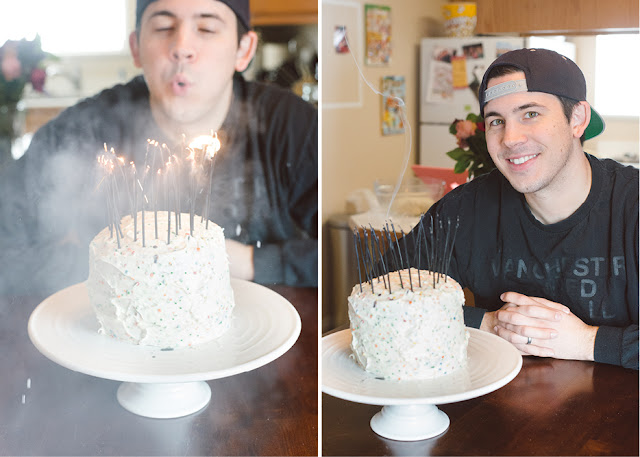
^^^not the cutest candles, but they sparked a bit & it took mark a few attempts at finally getting them all to blow out^^^

mark celebrated his 28th birthday on saturday! he started off his day with a nice long, 4 hour GMAT class which ended around noon. {who wouldn't enjoy that, right?} then he decided it was cake time. this cake wasn't my proudest moment, but when the birthday boy requests funfetti from a box then that's what you make! i wanted to get tall, cute candles but all i could find were these horrid black sparklers. so forgive me for the slanted, creepy candles. :) it was fun watching mark try to blow all of them out, though.

he spent the rest of the afternoon relaxing while i slaved away in the kitchen making a french inspired meal. mark lived in paris for 2 years so i thought it would be fun to have some "french" food. i made a whole roasted chicken, ratatouille and homemade baguettes. totally my idea of what french people eat :) and everything turned out delicious! {recipes to follow!}

around six mark was picked up by some buddies & they headed out to wendover, a mini-ish vegas a few hours away from salt lake, for a late night of gambling! it was his day & i was happy to encourage him to have fun with his friends! although, it had been snowing really badly earlier in the day & i was a bit nervous about their drive. but they arrived safely, had a blast, mark didn't lose any money!, and they got back into town around 4am...crazy boys! & what did i do while he was gone you ask??? well i ate a few more slices of cake & watched back to back lifetime movies, what else? i am too predictable! ;)

it was a hectic day for the both of us, but so much fun!
hope you had a HAPPY BIRTHDY, babe.

February 25, 2013

recipes {apple cider glazed pork chops}

happy monday, y'all! the beginning of the week is always so hectic for me. trying to get back into the swing of things & waking up early again...ugh! i hate that cooking begins to feel like a chore on the weekdays, but we all have to eat, right? so in order to stay excited about making a meal after a long day i am always on the look out for quick, easy & lean options for dinner. i am typically a chicken gal, but today i have a must try pork recipe for you that is so simple & definitely a weekday option!


pork chops typically come with the bone in & are about an inch or so thick...they are delish & look gorgeous on a plate, but this time i picked up some thin cut chops that i knew would cook quickly! i paired them with a simple apple cider glaze that boosted these chops to a whole new level! mark was crazy about it & i am still wishing there were more leftovers...

>> what you'll need
pork chops {any kind you prefer. i used about 8 thin cut, center cut pork chop without the bone}
salt & pepper to taste
3 tablespoons apple cider vinegar
1 glove garlic, minced
11/2 cups apple cider
1/2 teaspoon fresh rosemary, finely chopped

>> directions
1. pat chops with paper towel to remove any moisture. sprinkle with salt & pepper on both sides.

2. heat large skillet to medium-high heat. spray with oil & add a touch of butter. when the butter slightly browns then add the chops. {if your pork chops don't all fit into the pan at once then work in batches. do not over crowd}

3. depending on the thickness of your chop you will leave it in the pan on each side for about 3-6 minutes.

4. once you have fried all of your pork chops remove them from the pan and set aside on a plate.

5. lower the heat to medium and add your garlic. stir continuously & keep your eye on the garlic because you don't want it to burn. let it cook for about 30 seconds until fragrant. then add the vinegar &, with a wooden spoon, scrape the bottom of the pan to release any bits of goodness stuck to the bottom of the pan.

6. add the apple cider & crank up the heat until you have a low simmer. let the sauce simmer for about 5-10 minutes until it reduces & forms a glaze.

7. add the chopped rosemary & allow it to cook for a minute or two. turn off heat. add the pork chops back into the pan & cover with the glaze!

pair these puppies with some mashed potatoes, roasted root veggies and a fresh garden salad & you are all set!

**the recipe for the glaze is just enough to lightly coat each chop. if you want more of a sauce then you may want to double the recipe. 


follow five foot seven on bloglovin' & never miss a post!!
stay tuned for homemade french baguettes coming later this week!!

February 18, 2013

recipes {yellow cake & chocolate frosting}

i realize i've kind of been on a recipe kick lately, but i can't help but share a good recipe when i've got one!! anyway, on valentine's day i made a fabulous cake for mark & i to enjoy. this recipe is one of my good friend's favorites & has quickly become one of mine as well. this cake isn't overly sweet so it's perfect for those of you who love treats but hate the sugar comas that often follow.


the perfect yellow cake

>> what you'll need
2 cups all-purpose flour, spooned and leveled, sifted after measuring
1 cup sugar
1 tablespoon baking powder
1 teaspoon salt
1/2 cup butter, softened
1 cup milk
1 teaspoon vanilla extract
2 eggs

>> directions
1. preheat oven to 350 degrees. grease liberally and flour two 8-inch cake pans. {i used 3 6-inch cake pans}

2. in a large mixing bowl sift together flour, sugar, baking powder and salt.

3. add butter, milk and vanilla. beat with a hand mixer on medium speed for 3-4 minutes, occasionally scraping sides of bowl. add eggs, beat for 3 more minutes.

4. pour batter into prepared pans, dividing equally among both. bake 30 to 35 minutes or until toothpick comes out clean. {mine were done at around 25 minutes when split among 3 smaller pans}

5. cool in pans on wire racks 10 minutes. turn out and cool thoroughly on wire racks.

& now for the frosting...


chocolate frosting

>> what you'll need 
1 cup sugar
4 large egg whites
3 sticks plus 2 tablespoons butter, softened {i prefer salted butter}
2 teaspoons vanilla extract
1/2 cup cocoa powder

**this recipe makes a lot of frosting! it is the perfect amount if you wish to add some decorative touches like i did or have some leftover, but if you'd rather simply frost the cake then 2/3 this recipe & you will have a more appropriate amount!

>> directions
1. whisk egg whites and sugar together in a large metal or glass bowl over a pot of simmering water. whisk occasionally until you can’t feel the sugar granules when you rub the mixture between your fingers.

2. transfer mixture into a bowl for an electric mixer or you may use an electric hand mixer. whip until the egg & sugar combinations turns white and about doubles in size.

3. add the vanilla and continue to whip until incorporated. 

4. add the butter a stick at a time and whip until you have a fluffy & well combined frosting!  

Related Posts Plugin for WordPress, Blogger...